
Assembling a PC in simple steps.
Hey Guys, if you are looking for some tips on how to assemble a PC in few simple steps, then you have to follow this steps:-
I will break this down in steps, so that it will be easy for you to understand and it will be easy for you to understand and i hope i will be able to solve your problem.
PART 1
- Preparing the cabinet.
- Installing the SMPS.
- Installing the mother board back plate.
- Connecting a case fan to the cabinet.
Lets look at how to prepare the cabinet which consists of cabinet cases. Cases can come in different sizes. The most common computer case type is the tower model. The cases can be further classified into mini-size, mid-size and full-size tower cases. Depending on the specific number of internal drive bays and the height of the tower.
Although, mid tower cases are widely used.
In addition, there are Slim Line Cases Or Desktop Cases, which are simply tower cases turned, sideways. They can hold a monitor on top of the case.


Different types of computer cases
Okay! Lets, get into our topic now.
So first lets discuss how to prepare a case or cabinet.
Zebronics rolls out- Rays - series cool cabinet is a tower cabinet.
These types of cabinets are usually opened by removing 2 or 3 screws on each side of the back of the case.
Preparing the cabinet
To open the cabinet, perform these simple steps:


- Remove the screws of the right hand side panel.
- After removing, slide the panel back to release them from the chassis of the case.

- Now, Once you have removed the chassis from the case the next step is to install the SMPS.
- If some one doesn't know the full form of SMPS, so there you go it's (Switch Mode Power Supply).
- So if you are at the very basic level then you may think how SMPS looks like, So here it is.

Switch Mode Power Supply
- Now the one question that might comes to your mind is what does SMPS do?
- As the name itself tells that its Switch Mode Power Supply, So it basically provide powers to all components such as inductors and capacitors.
- It converts AC voltage to low DC voltage.
- These were some basics information you need to know as a beginner.
- Now before you install the SMPS , check that it is functioning properly.

- Now one might also think that how can i check the SMPS, before even installing in the chassis?
- So the answer is as simple as that, you just have to short the Green (PS_ON) and Black (Ground) pins of 24 ATX power connector using metal wire.
- Now once you have shorted this wire, just connect the one end of the power cable to the SMPS and another end to the wall socket, and just check if the fan rotates. if it rotates then your SMPS is ready to be installed.
- After checking the SMPS unplug the power supply.

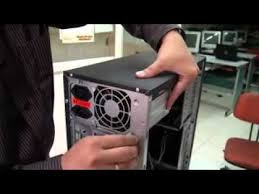
- Now locate the area of the SMPS, where it can be fixed.
- In tower cabinets SMPS section will always be at the top rear area of the cabinet.
- Slowly, place the SMPS at the proper location.
- Hold the SMPS until you connect few screws and it becomes stable.
- Align the screw holes of SMPS with the screw holes of the SMPS section of the cabinet and tighten the screws.
- Now the SMPS has been installed successfully into the case.
Installing the mother board back plate
After installing the SMPS, the next step is to install the mother board back plate.
The mother board back plate is also called as blanking plate, which gives you access only to the ports that your mother board has. The back plate comes packed with the mother board.
Let us now see those steps which are required to the mother board plate.

Mother board Back plate.
- Measure the back plate with the mother board. To do this, just hold the mother board until the cut outs matches the ports on the mother board.
- Push the back plate against the mother board, so that any text written on it is readable.
- Make notes of the ports that are covered.
- Remove unnecessary bits to open the ports.
- After finishing these steps, lets move on to next step.
- From the inside of the case push the mother board plate into the gap at the rear of the cabinet.
- Remember to align it so that it is the same way up as when you measured it against the mother board.
- Now the last step of installing the mother board back plate, is to make sure that the ridge which is around the outside of the plate, clips it into the hole and check if it remains stable without support.
Connecting a Case Fan

- After placing the SMPS inside the cabinet, the next step is to install the cabinet fan.
- Most cabinets at-least comes with one fan which is pre-installed and some cabinets have two.
- Typically, one fan is installed in front as an air intake and another at the back as an exhaust.
- Since, some fans only blow air in one direction, Special attention is needed to check which way the fan is mounted in the cabinet.
- To install the fan, go through these following steps:
- Orient the fan as per the marking made to indicate the direction of the air.
- Align the fan with the mounting points.
- Use screws to hold the fan in place.
- And screw all the holes required for the fan to become stable in its place.
In my next posts i am about to post some more tips on installing other parts in easy steps which is fast too.
If you liked my post Please Share and Tell me in comments in which thing should i improve my posts to give you better service and help you give more information's on Other Technical stuffs as well.


No comments:
Post a Comment
Please do not add any spam link in the comment box.